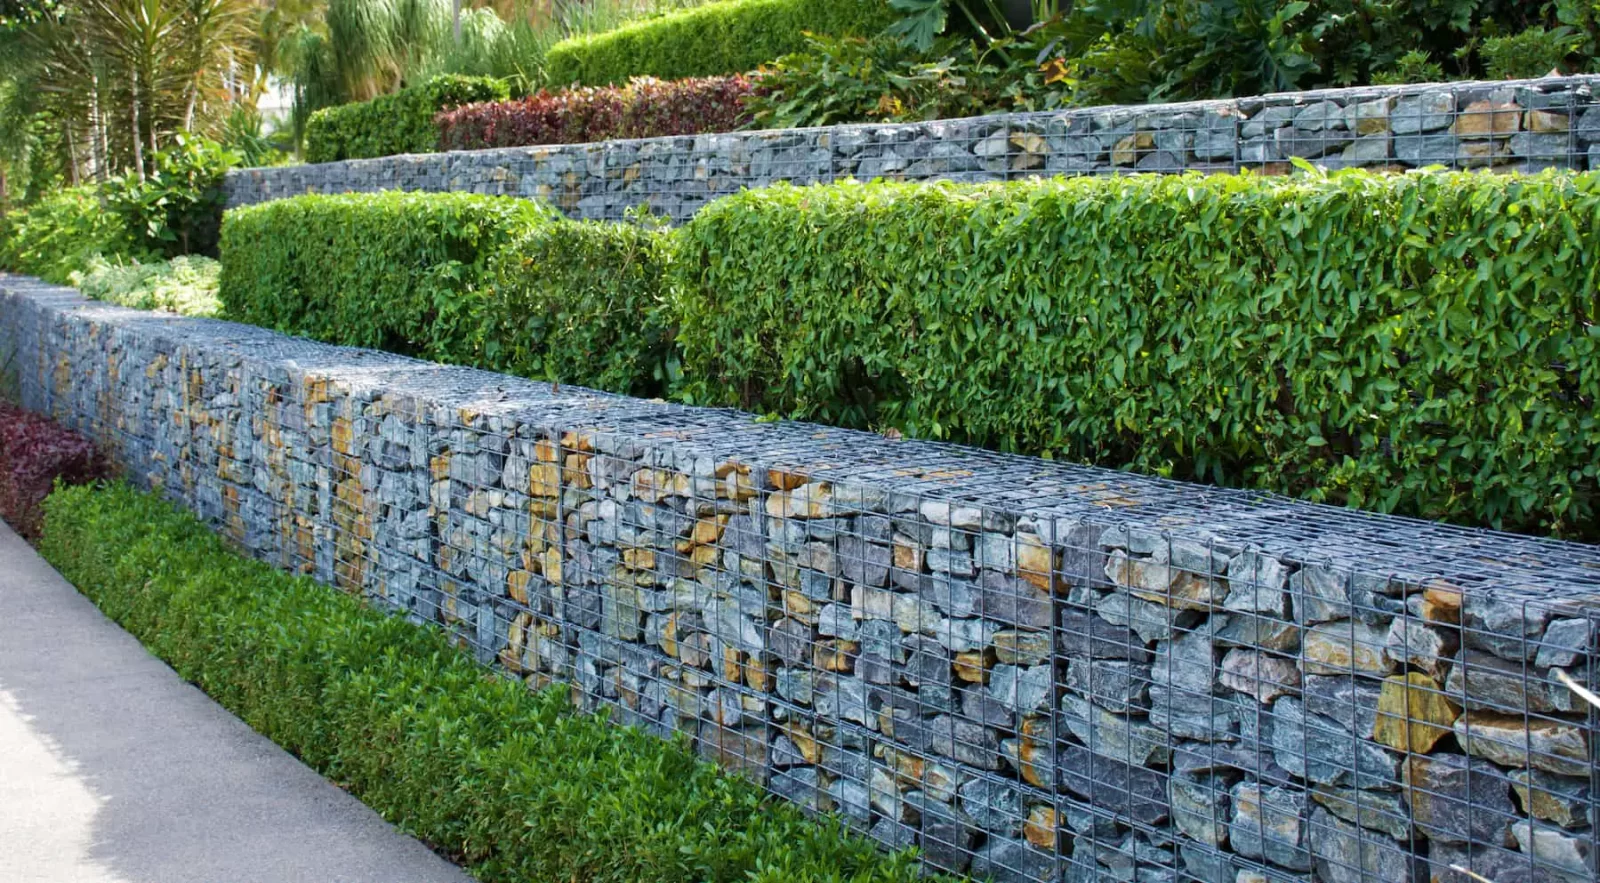
There are many reasons for wanting to build a fence, wall, bench, or garden enclosure, and there are equally as many solutions available. The Gabion Wall, which is often referred to as a Gabion Fence, is one solution that is both affordable, and relatively fast to construct. The materials used, and the skill required to construct one, are not enormous, which means that these fantastic solutions are great options for DIY enthusiasts, and for the same reasons, are also often used by industrial, municipal and military in a variety of landscaping solutions. These structures are practical, long lasting, and can be built into nearly any form factor and shape that one can imagine. This article highlights the most basic and fundamental components and methods used to building a Gabion wall, and will give you the overview you need to build a a Gabion wall to meet your landscaping needs.
The Basics – What is a Gabion Wall
In simplest terms, a gabion wall is a wire basket that is filled with stones or other materials, which contains the contents in the confined shape and size of the basket. The lifespan of these structures is determined by the wire itself, which means they will endure the test of time, and can be repaired as the wire deteriorates. The choice of wire used in the creation of the ‘basket’ is an important part of your materials selection process. The most popular of the wire types used is galvanized steel, though there are variety of options available to you depending on your budget and requirements.
Uses & Functionality
Gabion structures are used for a multitude of different purposes. While most well known by consumers as excellent fences, garden walls, planters or barriers, they are often used on a larger scale as noise barriers, flood walls, fish screens and retaining walls. Their versatility and relative simplicity are a big part of why they are so often used in such diverse and different ways. As they can be built in such a wide range of sizes and shapes, they offer practical solutions to a myriad landscaping uses, both for beauty and utility.
Gabion Wall – Major Components
The primary components of a Gabion are very simple – it consists only of the cage, into which you will place the other major components – stones or rocks.
- Stones (any type to suit your budget and aesthetic preference)
- Gabion Cage (available pre made)
Stones
The type of stone you choose is largely a matter of preference, though often will be dictated by availability, budget and the desired ‘look’ of the wall once completed. According to ImproveNet, a tonne of crushed stone can be purchased for between $27 US and $64, and while stone can be purchased in a variety of sizes, it is wise to check with a local aggregate and stone supplier when budgeting for your project.
Gabion Cages & Mesh
The word Gabion derives from the Italian word for ‘cage’, and as such represents the major component of the Gabion wall systems. The cages come in countless sizes and dimensions, and can even be self-made, though some experience in working with cable and wire will be 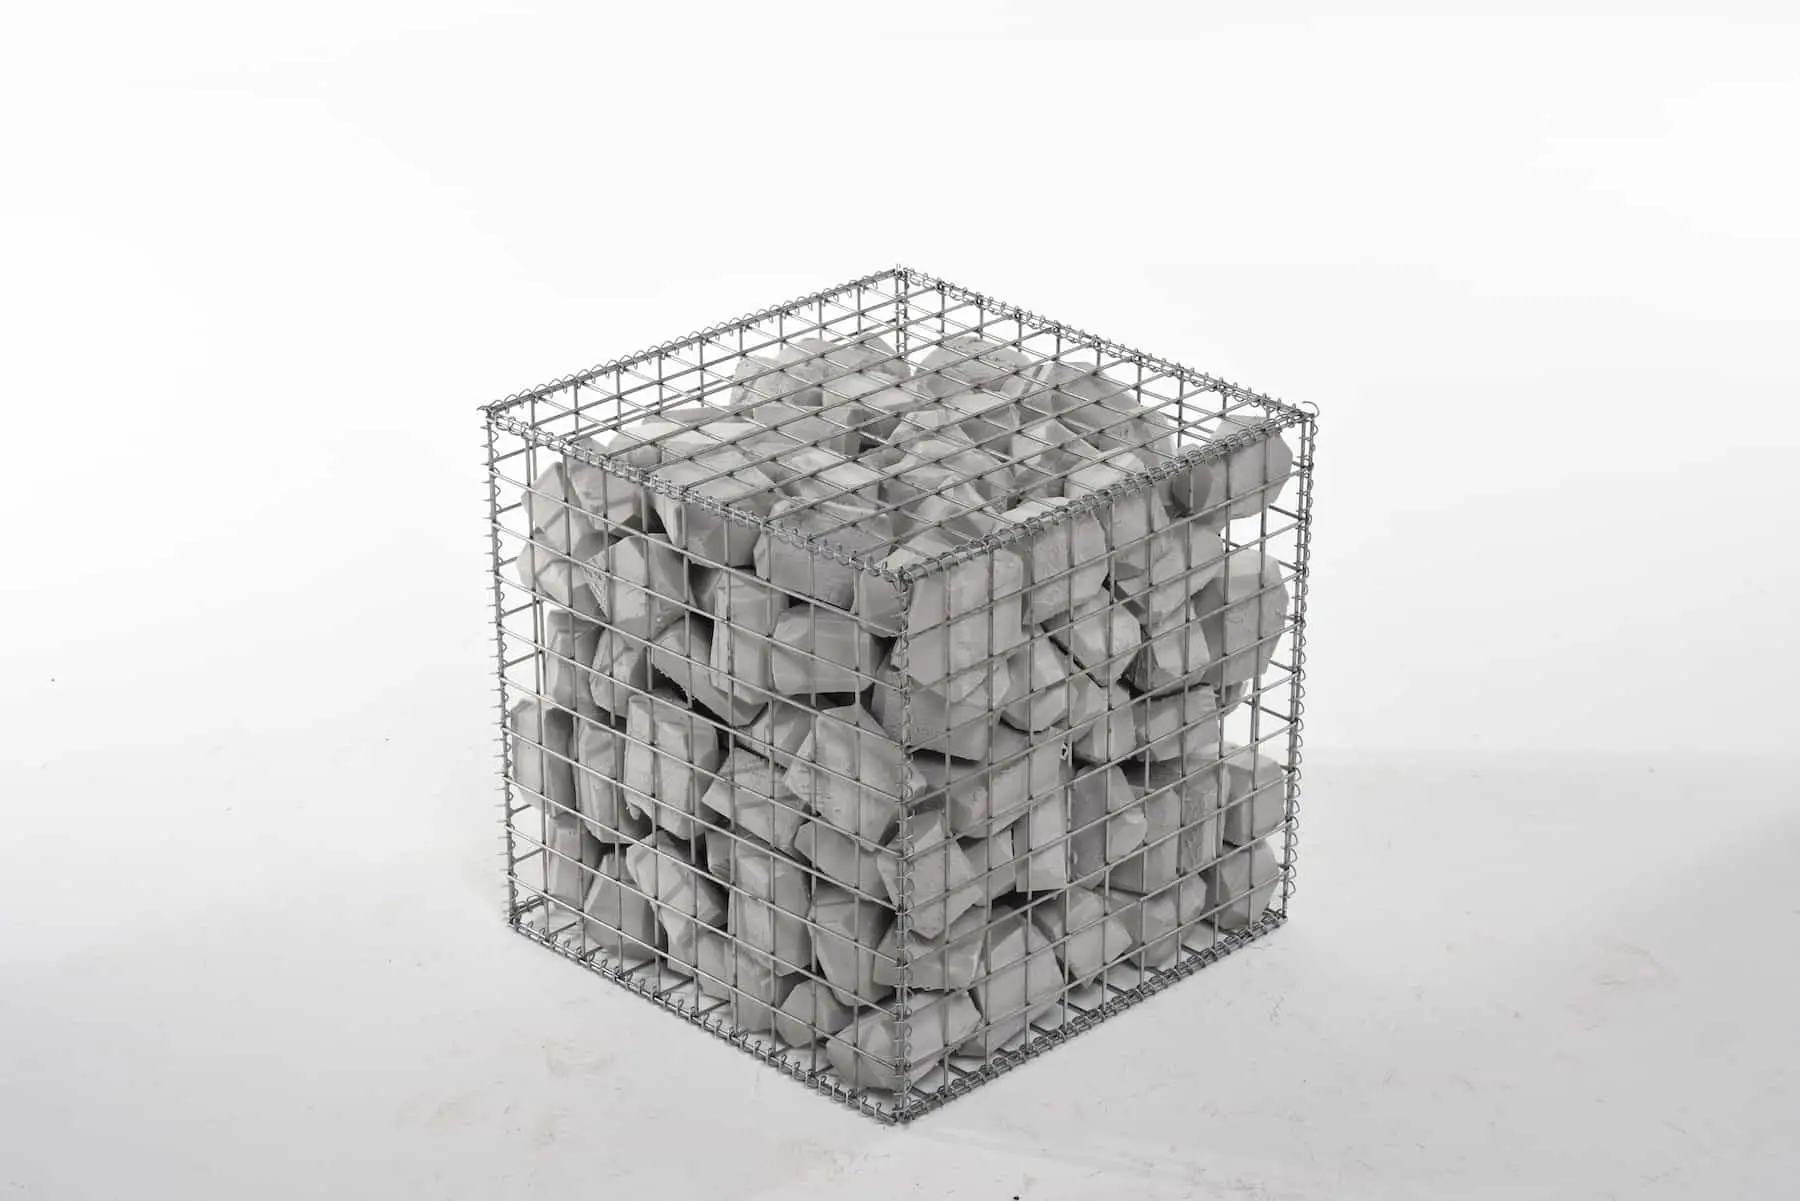 helpful. That said, there are numerous suppliers of Gabion cages, from whom you can purchase pre-made container cages for your projects. In the resources section below, we provide a list of some well known suppliers in the U.S., which will assist you in determining the sizes and prices to expect if purchasing pre-made Gabion cages. As mentioned above, the lifespan of any Gabion wall will be dictated by the quality and type of wire that the cage is constructed with, so it is wise to make choices that provide the greatest durability and lifespan.
Tools – What You Need to Build the Wall
It is important to have the proper tools to assure you complete your project in the best possible way. As the Gabion system of fencing and wall building is very straight forward, the types and number of tools you need to get the job done are limited. Most DIY and home handy person will have these tools available at hand, or they can easily be purchased without much additional cost.
-
- Work Gloves (working with wire, you will definitely want to keep your hands protected)
- Heavy duty pliers
- Heavy duty wire cutters
- Line Level
- Hammer
- Wheelbarrow
Depending on where you will place your wall or fence, you may want to have additional equipment for hole digging, and moving soil or dirt, so it may be required to have shovels, rakes and wheelbarrows handy.
Building a Gabion Wall – The Steps
The steps to construct a fence, or wall, out of Gabion baskets is very straight forward, 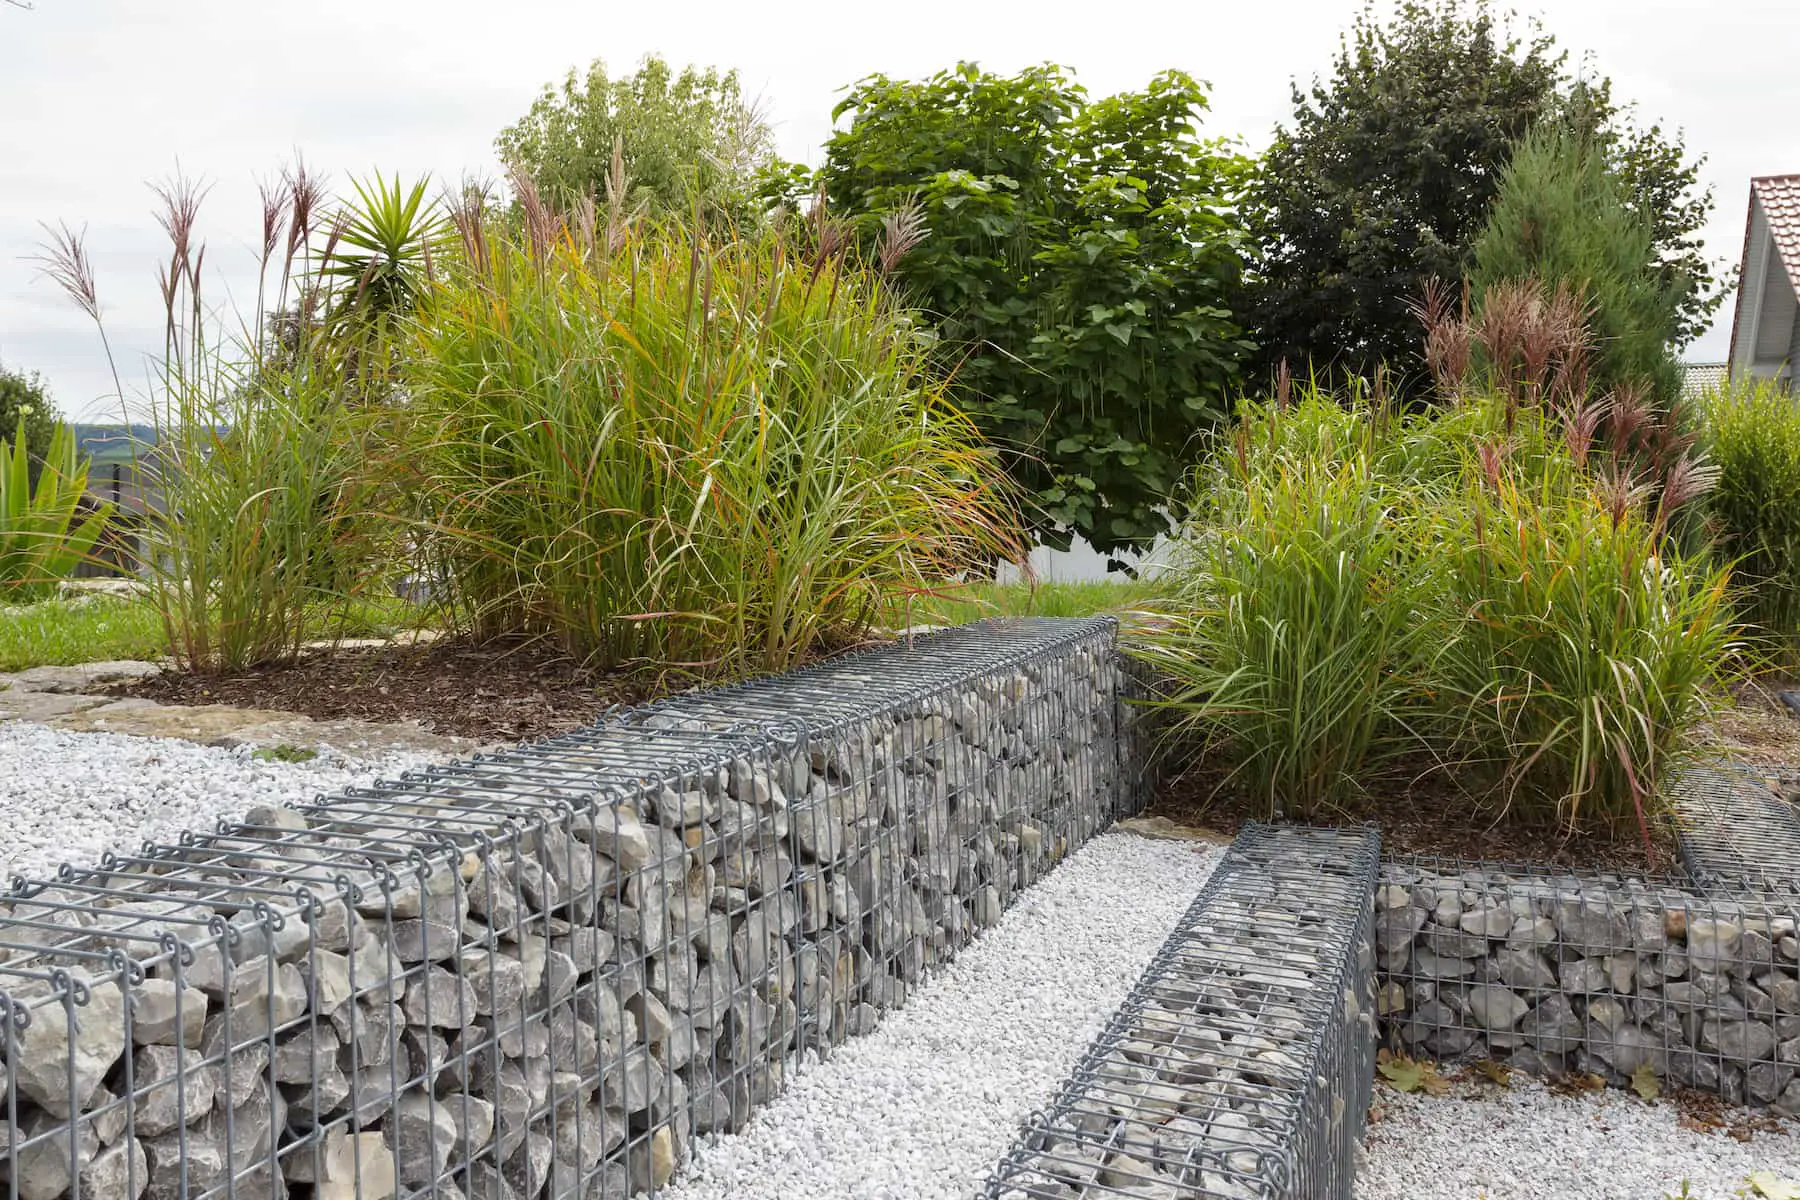 though it will be important to ensure you have done the necessary site preparations before hand, to ensure your construction is level, and has a good foundation to sit upon. In many cases, concrete can be used as a foundation, or even a leveled gravel platform. What is important, is that you’ve given careful thought to the space required, and measured out the area appropriately.
1 – Site Layout
In order to succeed, and to create the most appealing wall or fence possible, it will be necessary to ensure you have outlined and measured your area correctly. Using a string to mark out your wall line is a useful way to ensure it is both straight and level, and matches the vision you have for your construction. Lay your string on pegs for the length of the wall you require, and ensure it is level using a line level. Ensuring your wall foundation is level will make an enormous difference, and ensure your wall does not lean, which can create problems over time as the stones and the construction settles over time.
2 – Base and Foundation Preparation
In order to ensure your Gabion wall sits level and balanced, it is imperative that you prepare your ground, or foundation, with care. You can use a shovel or turf remover to clear the area that you will be placing the structure. If the ground is already cleared, just be sure it is well compacted, smooth and level, and that the ground beneath is solid and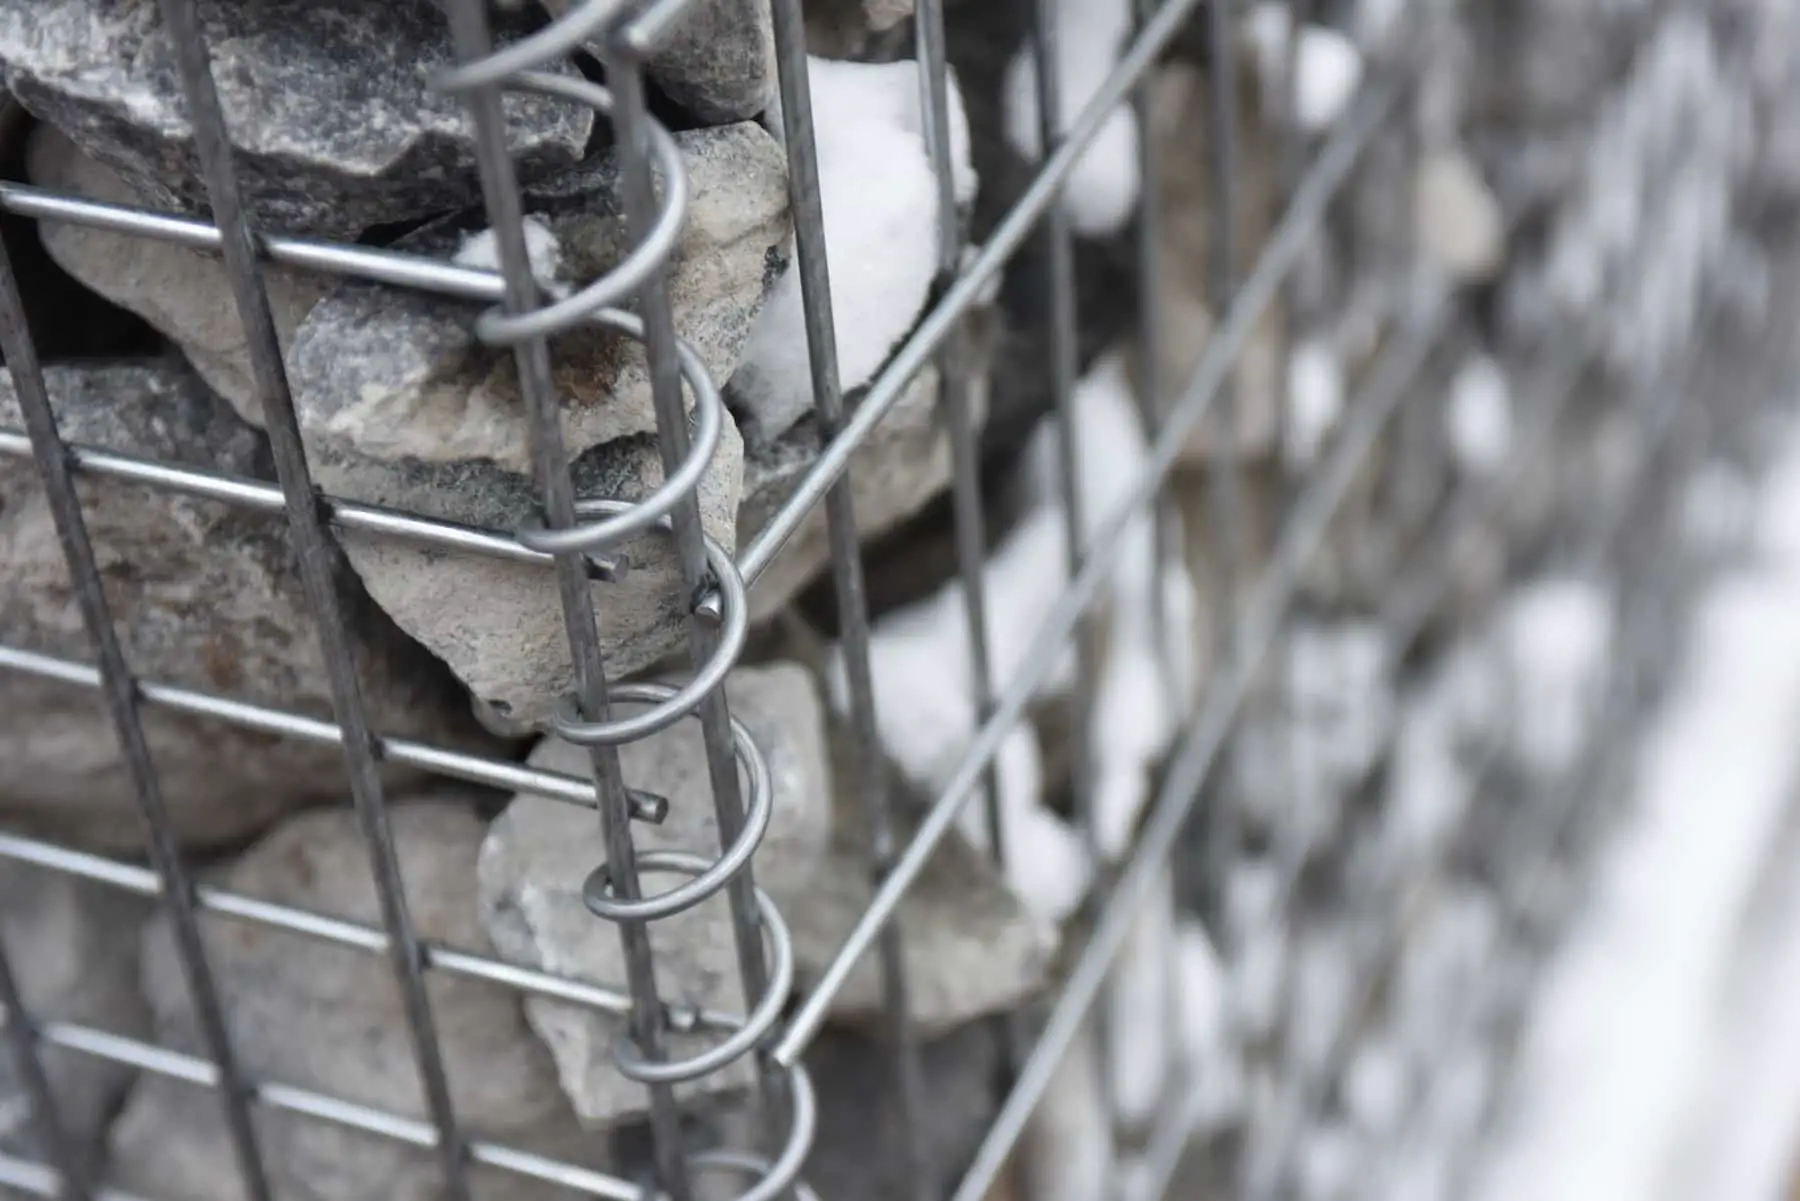 will not sink beneath the weight of the wall. In cases where your ground is very soft, or sandy, it will be necessary to put a solid layer of gravel at the base. It is recommended that a thickness of no less than 6 inches be used in this instance. Finally, to ensure that no weeds or other growth will move through your structure, it is wise to place landscaping fabric beneath the wall, to prevent plant growth through your Gabion cages. If you will be using gravel as your base, it will be useful to place the landscaping fabric down first, and place the gravel on top, after which it should be compacted to ensure it is level and solid enough to support your structure.
3 – Supports and Pilon/Pillar Installation
There are a few factors that will determine whether you will require additional structural support posts for your wall/fence. If the wall will be very tall, or if the thickness of your wall is limited, then it is advised the you install sufficient support into the ground, that will add strength and durability to your structure. This will prevent leaning and sagging of your wall – if you will backfill behind the wall with soil or other materials, then it is important that you add additional column support into the structure to provide the strength necessary for your wall. The columns supports will be within the cage of the wall, and will most likely not be visible, though they will be necessary to ensure the most solid structure (particularly if the your wall will be thin.
Each municipality will have specific requirements for the types of materials you can use for these support posts, though they are most often made of steel, or pressure treated wood. The posts should be buried into the ground up to 3 or 4 feet, and held in place with 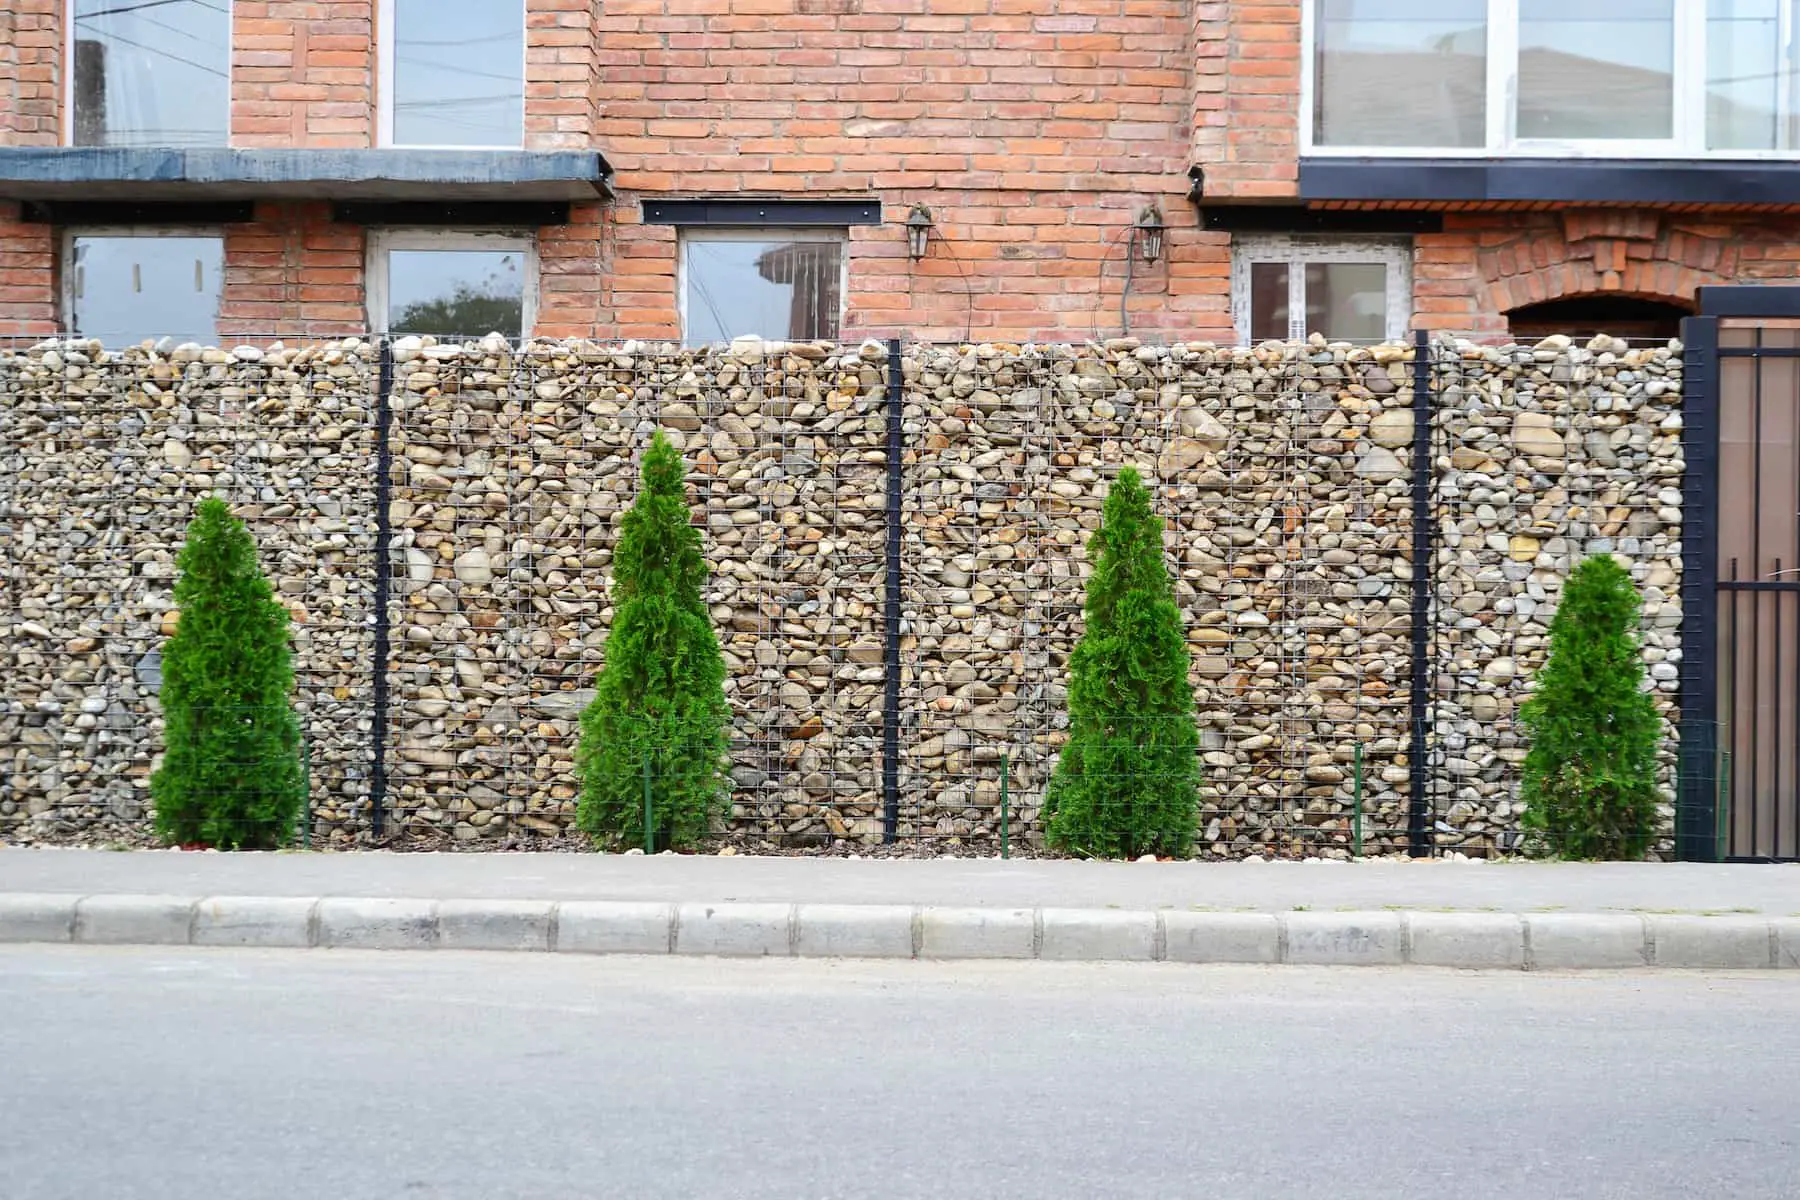 concrete. The process is not difficult, though the amount of work required to dig the holes for your posts will vary depending on the soil in your area, and the tools available to you. A quality hand auger will definitely work, though many local equipment rental stores can provide power equipment that will make your job much easier. Once the holes are dug, you can use basic dry mix concrete to fill your holes, and place your support poles. Pay attention to the alignment and leveling of the poles when placing them into the concrete, and use supports to keep them in position until the concrete has completed drying (usually 24-48 hours). Once the concrete has dried, and your poles are solidly in place, you are ready to move forward with installing your Gabion baskets, and begin adding stones and building the final structure.
4 – Basket Placement
Depending on where you have sourced and purchased your baskets, it may be necessary to assemble them before putting them in place. In most cases, the process is very straight forward, and involves simply placing them together and weaving them into a ‘basket’ using spiraled wiring. Starting with the bottom base mesh, add each upright component, weaving it to the bottom and adjacent mesh using the spiral coil provided (or using your own wire as needed). In most pre-purchased Gabion systems, all of the necessary spiraled connectors will be provided. The final step will be clipping the tips of the coils and pinching the ends to ensure they are well connected and secure. The end result will be a solid wire framed Gabion basket waiting to be placed. Ensure that your baskets are not too long, or that they have supporting dividing panels within, that are spaced roughly every 3 feet. This ensures that the basket maintains its general shape, and does not bulge or deform from the weight of the stones that will be placed inside.
Once your baskets are complete, you can place them in your desired shape and location in the area you have prepared earlier. If you have support posts, just slide the cage over the posts and place them, ensuring the posts are in the locations you wish them to be, so as not to be visible. If you will be stacking several Gabion cages on top of each other, then ensure your individual cage heights are around a maximum of 3 feet each. Obviously, as these baskets need to be filled, you will finish filling the first layer, before adding the cages for the next layer on top.
5 – Stone Placement and Filling the Baskets
One of the most important aspects of your wall will be your selection of stones to complete it. While it is possible to use other materials, such as cut logs and so forth, it is stone that will provide the longest lifespan for your wall. Sourcing the stone will be an important part 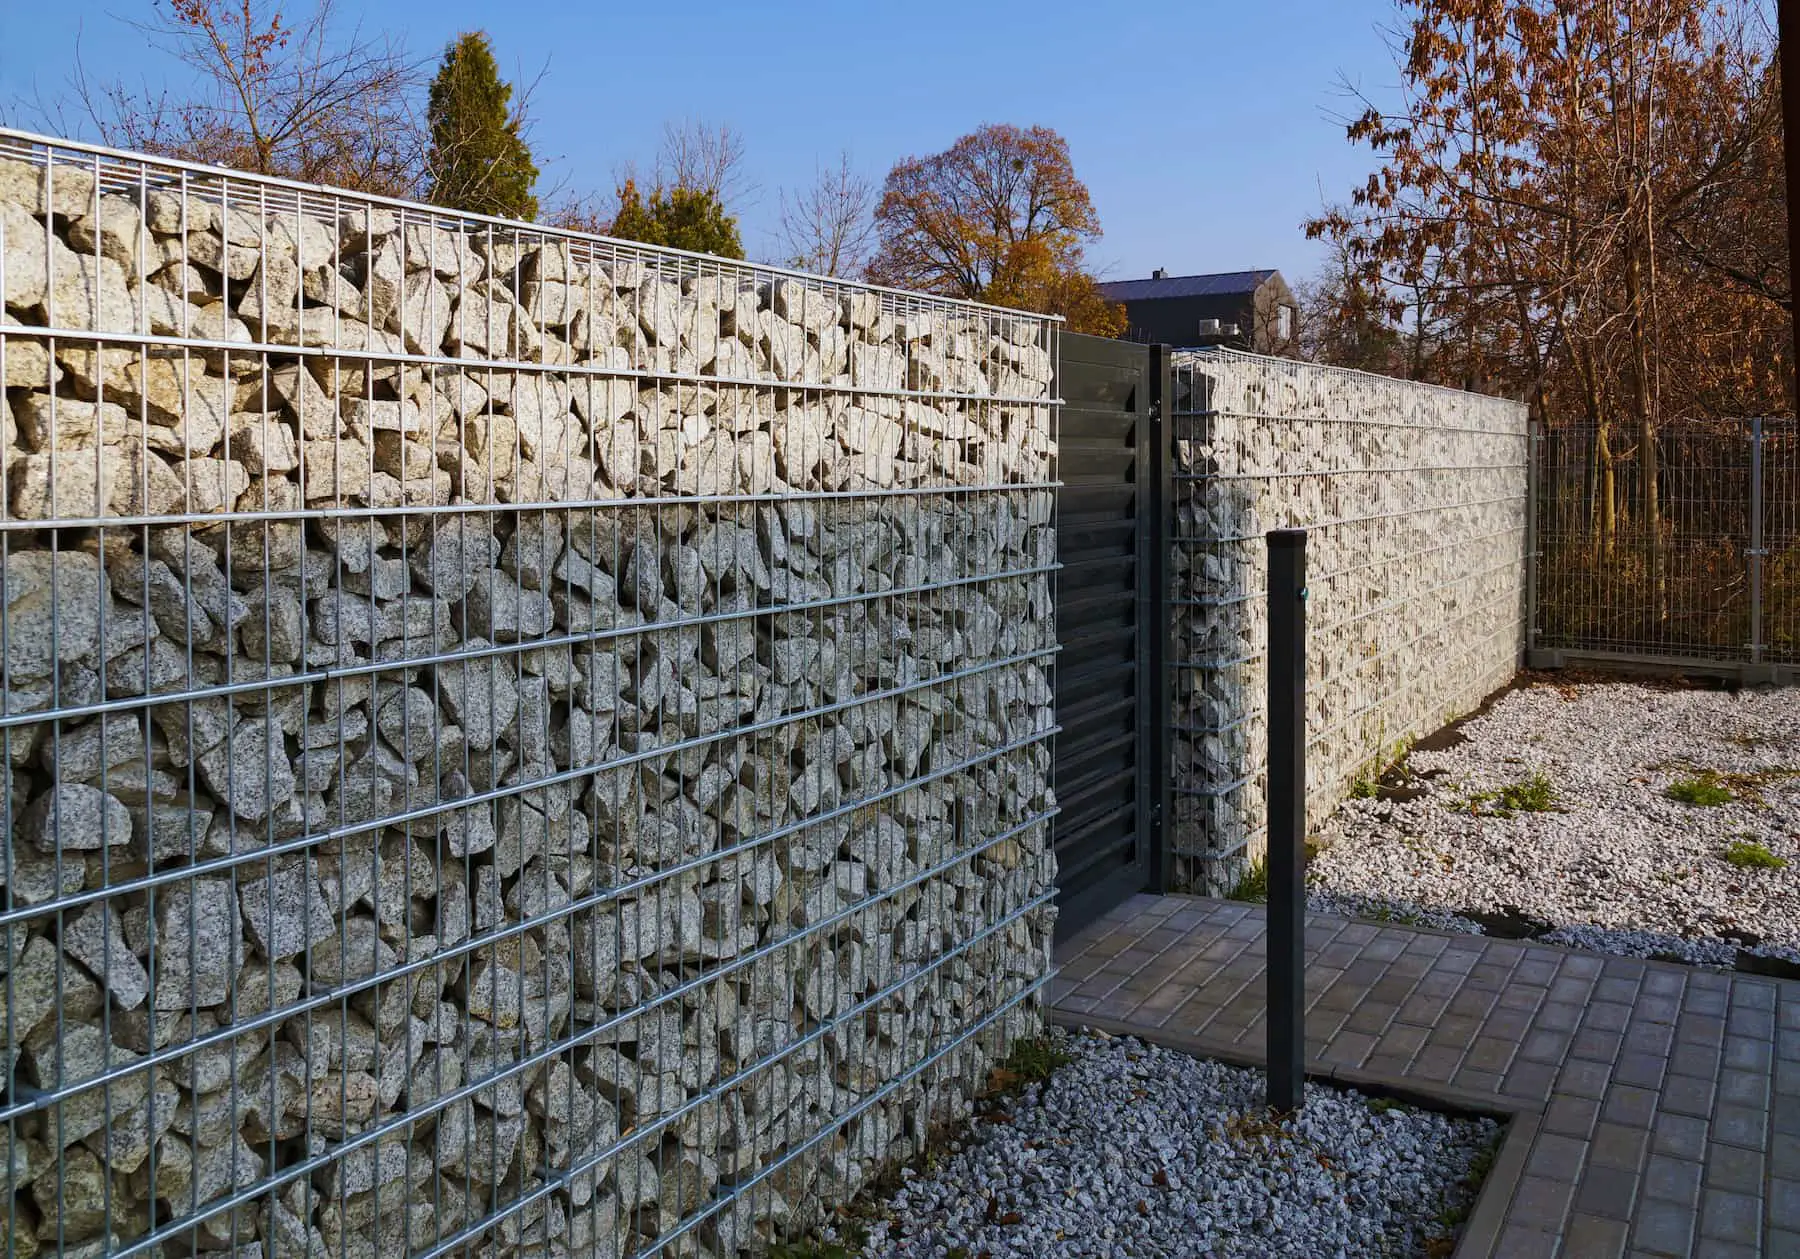 of your building process, and ensuring that the stones you select are the correct size and shape to fit your cage will be critical. It won’t be possible to use small stones that fall through the mesh of your cage, so the size of the stones you select is important. That said, it is possible to select larger stones for the outer facing edge of your wall, and fill it with smaller stones or gravel. This method provides you with the larger stones being the ‘visible’ part of your wall, and the inner smaller stones providing the support and fill for the rest of your basket. This can be an excellent method of building a Gabion wall quickly, and in many cases is a less expensive option.
Finding stones and rock for your wall is fairly straight forward, though it can be a costly experience depending on the size of your project. Most local landscaping supply companies can provide you with the stone you require, though it may be worth considering other options depending on where you live. Additionally, if you wish to have a style and color of stone that is native to your area, it will be necessary to source this from local suppliers, or collect it over time from the landscape. While collecting the stones can be a cheaper alternative, it can be very time consuming.
Ensuring that you pack the rock carefully will produce the best results. It can take time to get the ‘look’ and ‘feel’ that you are looking for, but the time you take in this step will produce a much more attractive and satisfying structure once completed. Working in layers is the best way to ensure you get the effect you are looking for, and adding to each layer in steps until you have reached the top. Again, your outer facing stones are the most important, so work to arrange them with a flat straight surface for the most impressive results. We have provided numerous examples in the gallery below, which you can use as inspiration for your project.
6 – Balancing & Leveling
If your Gabion wall or fence will be more than a single layer, then you will need to stack additional baskets on top of the previous layer to get the height you desire. Again, try to stick to a maximum basket height of 3 feet each. While you can stack the baskets on top of each other for additional height, it is wise to keep each basket layer to a 3 foot maximum. This is done for a variety of reasons, though baskets of larger than 3 feet tend to bend and bulge easier, and for this reason it is wise to keep them to a limited height per layer.
Once the first layer has been completed, and the baskets are filled as you desire, you can close the top mesh layer of the basket, and use the coiled wire to seal and lock the mesh lid in place at the basket’s top. After this is completed, you can arrange your second layer of baskets accordingly, being mindful to place them over and around any support 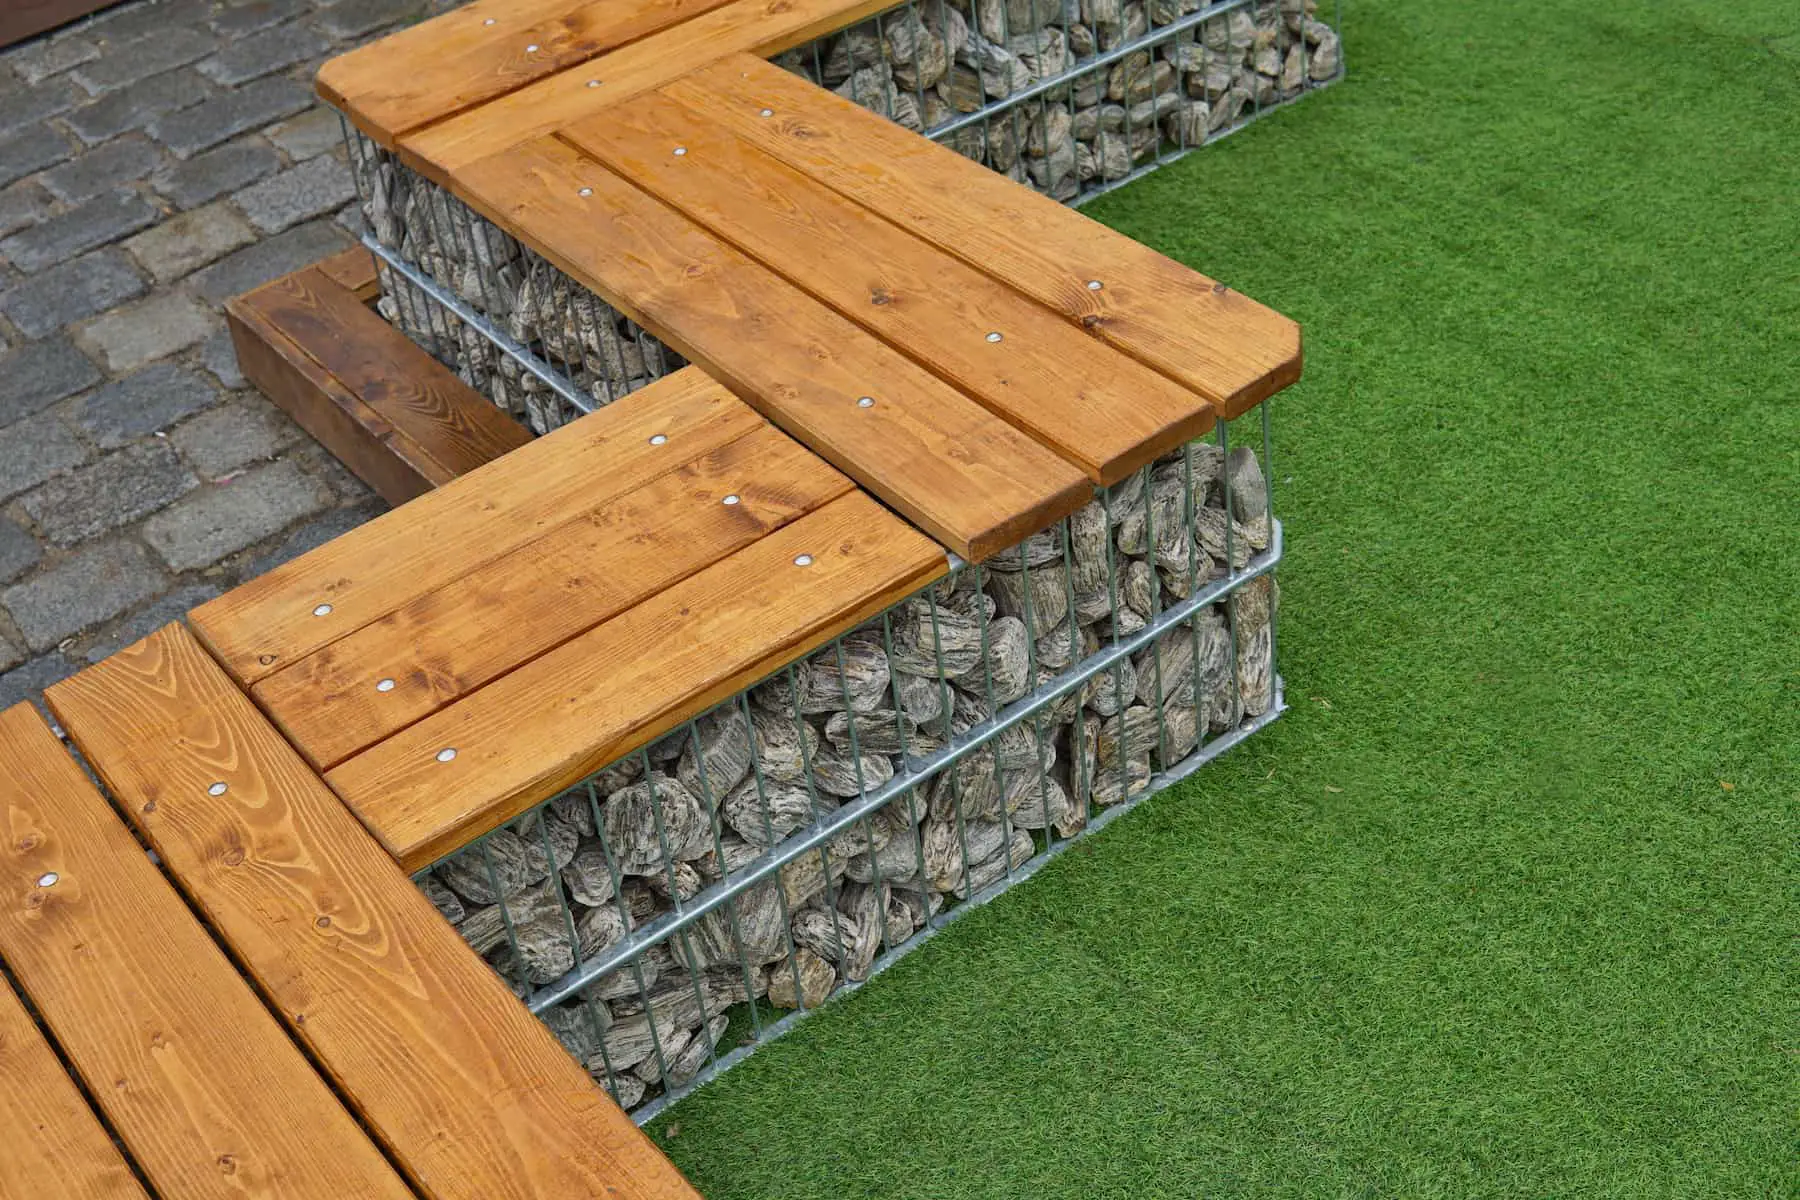 columns/poles that you have prepared. Once this is completed, you continue filling the baskets in the same fashion as the first layer. Be sure to pay attention to the basket alignment of the second layer, and if use any additional connecting wire to crimp them in place to the first layer. By ensuring the additional layer baskets are aligned and level with the layer below, will ensure you have a contiguous and straight edged wall that will look fantastic!!
7 – Cleaning & Finalizing
Once you’ve managed to place all your stones into the cages, and have sealed them up, you can step back and marvel and the beauty of the structure you have created! It will be helpful to give your wall a good ‘hosing down’, just to clear up any dust and debris that may have accumulated in the process of building the structure. Many people also place some additional landscape fabric at the base of the wall, on top of which they place small gravel stones to create a great effect, that looks amazing!
Summary
Building a Gabion wall or fence is one of the simplest ways to create a beautiful and practical fence, wall, bench, or garden enclosure. They have even been used as BBQ and fire pits, and are enormously flexible in their use. This guide highlights how to make a Gabion Wall, and provides a great overview of exactly what components are required, as well as some important points to consider when building these structures.
For some other great articles on other home improvement and value adding activities, check out some of our other articles on Lifestyle and Home Design, and learn more about some great solutions and inspirations. Also be sure to check out all of our articles on Backyard Bunkies, Garden Houses and Sheds, and all the various inspirations that we’ve highlighted at TAG Level.
Let us know your thoughts, as we love to hear from you!! Be sure to Join Us to get future updates and other great inspirations and ideas from TAG Level.
